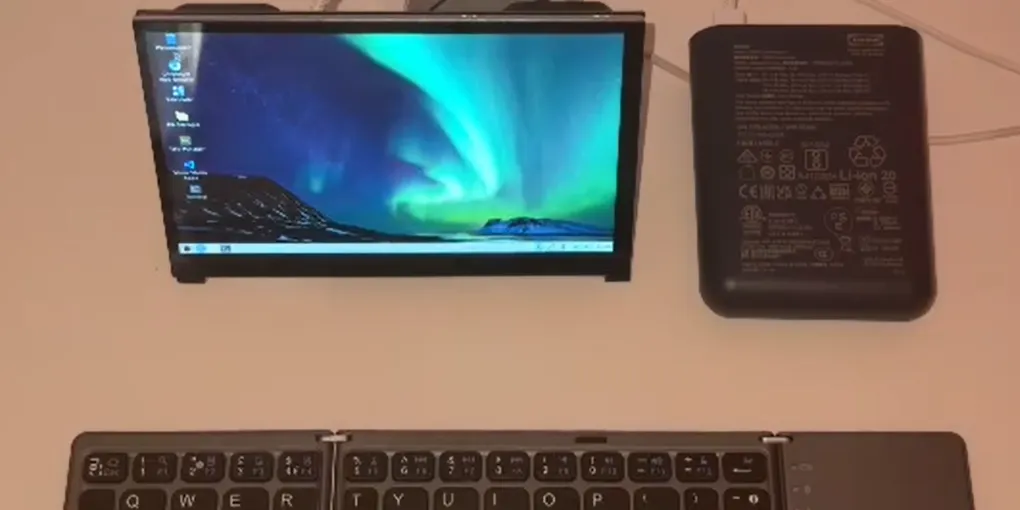
My Portable Computer Setup for under £60
Learn how robots calculate the joint angles needed to reach a target position using inverse kinematics.
Building a Portable Raspberry Pi Setup for Under £60
Portable computing doesn’t have to mean buying an expensive laptop. For many programming and electronics projects, a Raspberry Pi provides everything you need in a much smaller, cheaper package. With a compact display, a foldable keyboard, and a power bank, it can become a self-contained Linux workstation that’s easy to carry almost anywhere.
Since I already owned a Raspberry Pi 4 Model B, putting this setup together cost me around £60. It’s a simple build, but one that’s become surprisingly useful for coding, testing projects, and experimenting with new ideas away from my desk.
Why use a Raspberry Pi instead of a laptop?
A Raspberry Pi obviously isn’t as powerful as a modern laptop, but raw performance isn’t always the most important factor. For writing code, learning Linux, controlling hardware, or connecting to remote systems, the Pi has more than enough capability.
One of its biggest advantages is that it’s designed to interact with hardware. Unlike most laptops, every GPIO pin is immediately accessible, making it easy to prototype robotics projects, connect sensors, or experiment with electronics without carrying additional equipment. It’s also a dedicated development environment, so you can install packages, experiment with operating systems, or even break things without affecting your everyday workflow. If something goes wrong, swapping or reflashing the microSD card is often all it takes to start again.
If you’re interested in robotics, a Raspberry Pi is also an excellent way to learn ROS. Because it runs Linux natively, you’ll be working in an environment that’s much closer to the systems used on real robots. Although ROS can be installed using Windows Subsystem for Linux (WSL), some packages and hardware integrations are easier to work with on a native Linux installation. For beginners, that means spending more time learning robotics and less time troubleshooting their development environment.
Why make it portable?
Keeping the Raspberry Pi on a desk limits when and where you can use it. Adding a portable display, keyboard, and battery transforms it into a computer that can travel with you.
Whether you’re waiting between lectures, travelling on a train, spending an afternoon in a café, or attending a hackathon, you have a complete Linux machine available whenever you want to work on a project. That means ideas can be tested immediately instead of waiting until you get home. It’s also an easy way to demonstrate projects to classmates, friends, or colleagues without needing to carry around a monitor and power supply.
For students in particular, it’s an inexpensive way to carry a dedicated development environment without relying on a high-end laptop. Everything needed for programming, experimenting, and learning fits into a small bag while using very little power. Paired with the IKEA VÅRMFRONT 10,400 mAh power bank, I can comfortably get around 4 hours of development time on a full charge. If you’re writing code, reading documentation, or working in the terminal rather than pushing the Pi to its limits, you can often expect even longer battery life.
The trade-offs
Of course, portability comes with compromises. A 7-inch display isn’t ideal for multitasking, and the Raspberry Pi won’t compete with a desktop workstation when compiling large software projects or running demanding applications.
However, those limitations are easy to accept if your workload is centred around programming, robotics, or embedded systems. The smaller screen naturally encourages a simpler workflow, helping you stay focused on a single project, terminal, or editor instead of juggling dozens of windows.
Who is this setup for?
This setup is ideal for anyone looking for an affordable Linux development machine. Whether you’re writing Python, C++, or JavaScript, learning Linux, experimenting with ROS, building robotics projects, controlling hardware through the GPIO pins, or connecting to remote devices over SSH, a Raspberry Pi is more than capable for a huge range of tasks.
If your work involves video editing, 3D modelling, or other computationally intensive workloads, you’ll still want a more powerful computer. This setup isn’t intended to replace a workstation—it’s designed to make development more accessible, affordable, and portable.
Components I recommend
There are countless ways to build a portable Raspberry Pi setup, and the exact components you choose will depend on your budget and requirements. These are the parts I’d recommend based on my own build where budget was the main constraint, but don’t feel limited to using these exact products. Plenty of similar alternatives will work just as well.
| Component | Recommendation |
|---|---|
| Raspberry Pi | Raspberry Pi 4 Model B or Raspberry Pi 5 (The Pi Hut) |
| Display | 7-inch HDMI Display |
| Keyboard | Foldable Bluetooth Keyboard |
| Power Bank | IKEA VÅRMFRONT 10,400 mAh Power Bank |
| Storage | SanDisk Ultra 16 GB microSD Card |
Expanding the setup
One of the best things about a Raspberry Pi setup is that it can grow alongside your projects. As your needs change, you can upgrade individual components without replacing the entire system.
A larger portable monitor is probably the most noticeable improvement. While a 7-inch display keeps everything incredibly compact, moving to a 10- or 13-inch display provides much more room for coding, reading documentation, or working with multiple terminal windows. The trade-off is that the setup becomes less portable, so it’s worth deciding whether you value screen space or compactness more.
Another worthwhile upgrade is replacing the microSD card with a USB SSD. Raspberry Pi boards support booting directly from an SSD, which generally results in faster boot times, quicker application launches, and improved responsiveness. If you’re regularly installing ROS packages, compiling software, or working on larger development projects, it’s an upgrade that’s well worth considering.
Battery life is another area where you can tailor the setup. A higher-capacity power bank allows you to work for much longer away from a plug socket, although it also adds extra size and weight. Likewise, adding a wireless mouse, a protective carrying case, or a small USB hub can make the overall experience even more enjoyable if you find yourself using the setup regularly.
Like many engineering projects, there isn’t a single “best” configuration. Every design choice comes with trade-offs between portability, performance, battery life, screen size, and cost. The ideal setup is simply the one that best fits how you plan to use it.
Final thoughts
The biggest takeaway from this build isn’t that you can create a portable computer for around £60—it’s that useful development doesn’t require expensive hardware. A Raspberry Pi offers a complete Linux environment, direct access to hardware, and enough performance for a huge range of programming, electronics, and robotics projects.
Making it portable simply removes another barrier. Instead of your development environment living on a desk, it can go wherever you do, making it easier to learn, experiment, and build whenever inspiration strikes. Whether you’re learning ROS, writing your first Python program, or prototyping your next robotics project, a setup like this makes it easy to take your ideas with you.